Monday, December 01, 2014

Happy Cyber Monday!
I'm excited to announce today that I'll be participating as an artist in Creative JumpStart (CJS) 2015, run by Nathalie Kalbach. If you're not familiar with CJS, it's a one-of-a-kind online event to fire up your creativity in Jan 2015. 

Learn techniques, discover new materials, and connect with artists and crafters. 
Throughout January participants get 25 videos from 23 featured artists. I'm proud to be one of those artists, called “JumpStarters.” 

Head on over to Nathalie's site to sign up and for more details: http://nathaliesstudio.com/shop/online-workshops-ubermedia/creative-jumpstart-2015/
You get 25 videos for just $25 (USD).

But wait – it gets better: if you sign up today you’ll get $5 off. Just use this coupon code during checkout: cybercjs
*This is a limited offer valid from 9:00 am Dec 1, 2014 to 8:59 am EST on Dec 2, 2014.
So what are you waiting for? Sign up here, and apply the coupon code during check out process
CJS 2015 is proudly sponsored by Liquitex.

Sunday, November 09, 2014

Makers gonna Make


Hi there, here is a fun post for a late Sunday afternoon activity. You might think it's going to be all about how to carve a portrait stamp, but it's not.

Today I want to point out a lovely online store called TheGrommet.com. I've been telling people all about this site recently and most of the people I talked to loved it, but had never heard of it. Now, since I have a huge circle of maker friends, I thought it was my duty to share this site with you all! I'm always looking for unique gifts during the holidays and for special occasions--and TheGrommet.com has it all.

Have you heard of TheGrommet.com?
Have you ever purchased anything from TheGrommet.com?
Would you be willing to go check it out and then fill out my survey? (it's short, only 7 questions!)


Here is what TheGrommet.com says about their business:

At The Grommet, we truly believe that every purchase is an act of citizenship. That's why we launch undiscovered products and help them succeed. Our Grommets aren't just things. Grommets are products with a purpose invented by people with stories. Browse our Citizens' Gallery to learn about these ideas or post your own. Buy differently.

I love what this company stands for and I want more people to know about it--especially my maker friends! (and friends who love makers!)

If you fill out the survey after your visit to TheGrommet.com and leave your email in the survey, you will be entered to win a roughly business-card size hand-carved portrait stamp of the person of your choice!
If you go to my facebook page and "share" the post for this survey, you will also be entered to win. Two chances to win. What could be a better way to spend a few minutes on a Sunday?

Enjoy your weekend! and Thanks!

CONTEST AND SURVEY END midnight SUN, NOV 9th EST

Tuesday, October 14, 2014

10 Year Anniversary of Being Me

In a recent look back at my jennmason.com site I found out that I started this a decade ago on October 4th. So I thought it would be a great idea to give it a whole new look and freshen it up.


A look at my new website!

I used Adobe's Muse to make all the fun and interactive bits of this but the fun part is that I'm now StartUp Institute Boston learning how to do these things the hard way.

You'll notice I'll be blogging a little less for the next couple months as I enjoy the bootcamp work life of SI. If you want to know what I'm up to, please visit my Startup blog: SheStartsUp. I'd love to chat with you there!

If you have a website, what do you use to design it? Does HTML scare or excite you?


Friday, October 10, 2014

Mason Jar project without the jar!


Julie and I on the set of Scrapbook Soup.
Happy Friday and here’s another Scrapbook Soup episode for you! (http://www.scrapbooksouptv.com

Here is the info on the episode that will be airing for one week starting at 10am (EST) on 10/10:

In an interview with Jenn Mason, we learn how Jenn took her interest and talent in scrapbooking and applied them to other mixed media art forms.
  
Episode 402 Off the Page
Our designers are not content to stay on the page. First, Kazan Clark embellishes mason jars with die cut flowers. Jenn Mason talks with Julie about her creative process in a short interview. Next, Kathy Cano-Murillo shares her technique for creating a colorful sugar skull to embellish an album or journal. Julie shares a last technique using sugar skulls and flowers to embellish Halloween themed mason jars.

I like this episode because it has some fun Mason Jar art. And you know I love Mason jars. In fact, I thought I’d take a moment to share one of my favorite Mason jar projects that doesn’t even need a jar!
When we finished remodeling the basement of our carriage house I wanted to create a staircase that gave a nod to our name “Mason” and also gave the house a sense of whimsy.

Watch this video to see the finished project:

Here is how I got it done:

  1. Choose your design element. In my case, I chose all different Mason Jar logos.
  2. Set up an enlarging station. I use Tracer projector over the design element and project up onto a wall.
  3. Project onto clear contact paper. Tape up pieces of the contact paper (paper-backing side down) with paint tape and project the element in a larger, desired size. Trace around the element with a Sharpie©.
  4. Cut out the shape creating. Use a craft knife to create a sticky stencil.
  5. Place the stencils. Remove the paper backing and adhere to the stairs. 
  6. Paint the open stencil areas. I painted directly on the stained but unsealed stairs with oil paint (because they were sealed with an oil-based polyurethane. The oil paint too a LONG time to dry.)
  7. Distress if desired. I took some fine grained sandpaper to the painted items to make it look more like old crates had been used for the stairs.
  8. Seal as desired.
That's all there is. It's a little time consuming but pretty easy and worth it! What would you paint on your stairs? Share in the comments and enjoy this week's episode of Scrapbook Soup.

Have a great weekend!

Friday, October 03, 2014

TV time with Scrapbook Soup and ScanNCut cards!

Watch Scrapbook Soup episode 401 this week with host Julie Balzer and guess who!?
Here's the 411 On the most recent episode! (not written by me)
It’s a whole new season of Scrapbook Soup on line! Episode 401 will be on the Scrapbook Soup website starting at noon on Friday, October 3, 2014 and will run for 7 days.
The 400 series is all about developing a personal style. Create your own style as you mix it all up: materials, designers and techniques for one flavorful Scrapbook Soup!
Host Julie Fei-Fan Balzer and her guest, Jenn Mason, use ScanNCut to create colorful cut-out cards with photos.  Jenn draws her own template for the card and includes a mini-gift card in the template so she can scan and cut out both at once.  Using decorative papers that are colorful on both sides, she uses the perfectly cut images and negative space to create one-of-a-kind cards.

And here's the 411 on the most recent episode (written by me!)

Filming with Julie is ALWAYS a blast. We are all giggles behind the scenes and laughing with the crew. Even though I don't really scrapbook, I do love being crafty, especially with friends. That's why I always say yes when Julie invites me on set! 

If you watch it, let me know what you think! and if you make something from the show, send me a pic, too!

Have a lovely weekend all!


Monday, September 29, 2014

The Meta Blog...OR a Blog about a Blog

This past week I took advantage of my unemploymentness and headed down to NYC for some great food, great sites, and some fantastic time with friends. I spent a lot of time with the coolest art-girl on the block (aka I slept on her couch). I hung out in the studio working on my new website (coming soon!) while she worked on her Art Journaling Everyday video. 


Julie is adjusting her camera and checking the battery life. The camera is on a long arm attached to her tripod.

I thought you might like to see some of the magic behind the scenes. These pictures are a little dark but I wanted you to see how a great blogger sets up her studio for filming. Her room isn't terribly bright when she's working normally so she has set up a great set of task lights around the room so that she can see whether she's painting, filming, or making some other beautiful creation.

All ready to tape. Note the great lights Julie sets up for a well-lit video
For this blog, Julie is taping a time lapse video of her working on a journal page. I can tell you, she doesn't know what it's going to look like before she gets started. I think you can learn a lot about art by watching videos like this. It's like watching her brain on fast forward. 

Julie dripping ink down a page.

Here Julie is playing with some new inks (I think they were called IZINK.) Because she had never used them before, she didn't know exactly how they would work, but that didn't stop her. If you follow her blog, you can really gain some great tips on how to experiment fearlessly. It's just a journal page, right?


It's good to be tall--I took this on my tip toes so you can see the camera set up. Julie can look up at the camera screen at any time to make sure she's capturing exactly what she wants.
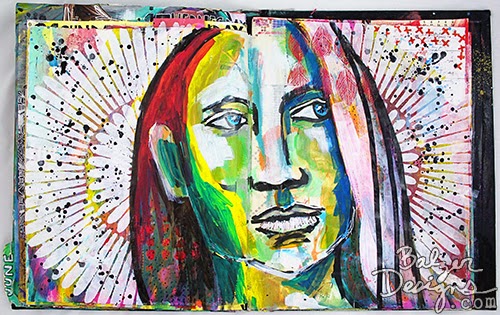
Here Julie is contemplating the face and the details. Note how the woman she is journaling has curly hair?

See more photos and the time-lapse video on Julie's blog.

Here is the page after--no more curly hair. I love the yellow pops on her face and the red dots in her hair. I don't think you could plan something like this out. Everyone loves taking classes from Julie but  I love how she teaches people to be themselves in their art making. Be unique. Be brave. Be experimental.


Dim Sum in Chinatown with Julie, Nathalie Kalbach, and Birgit (not Brigit) Koopsen.

And when you're all done...go out for Dim Sum!

Hope you enjoyed this look behind the scenes! What does your "photo or video set up" look like?


Monday, September 22, 2014

My 50 Shades of Gray and Green and Blue

If you haven't had a chance to watch Episode 101 of The Mixed-Media Workshop yet, here is the video. You can watch more episodes at the subscription site Craftdaily.com.


In this episode, I was showing off some RIT dyeing methods to Julie. Since then, I've been dyeing to experiment with more things to colorize. I needed to dye a pair of purple tights to a purple-black ombre for my daughter's Comic Con costume (Check that out in an upcoming post!) so I grabbed a few other things to play with.
  • Orange polyester ribbon (accordion folded with a binder clip)
  • Teal embroidery floss (wrapped in a loop and then bound with waxed linen thread)
  • White pom-pom fringe
  • Plastic faux rhinestone trim
  • Ivory vintage grosgrain ribbon


Photo of items ready to dye
Ready to dye!
Each item got a little different treatment but each started with getting a warm water bath first.
Next, I mixed hot water with dye--all different ratios but I used more than the bottle suggested.

The ivory ribbon is pretty wide so I rolled it up loosely and then just put it in about an inch of dye bath. You can see in this picture that the wet ribbon is wicking up the dye out of the bath.

The Mixed Media Workshop Video

The tights were the most complicated and required a very technical set up (a wire hanger). I tied the toes together and let it hang into the dye bath. I wanted to create an ombre so I dipped them a little extra in the bath and then immediately pulled some out of the bath. Once again, I was taking advantage of the wicking technique.


For the pom-poms, I just used a lid of a plastic takeout container and a little of the water/dye mixture and then carefully set them in the dye. These guys started wicking immediately.


And then the orange ribbon was dunked one end in to hopefully get a cool striped effect. (Remember, I had accordion folded the ribbon.)


And this is the final result.
  • The tights came out more navy than black but will serve their purpose. 
  • The pom-pom fringe, once it was washed, is a very interesting blue, green, and gray combo. 
  • The vintage ivory ribbon is probably my favorite, as it really is about 50 shades of gray. 
  • The teal ribbon ended up having a undyed core once I removed the waxed linen thread. 
  • The rhinestones have a magenta tint to them now.
  • And the orange ribbon? Didn't dye at all. Still orange. I noticed after the fact that the cardboard roll said 100% polyester.


So what did I learn? A lot! Here's my list:

  • Unless you really don't care how dark it goes, leave it in longer - be patient.
  • Try the floss again but scrunch it up differently and wrap it more.
  • Don't use polyester. (I knew that but forgot to check).
  • I still want to try the folding technique that didn't work with the orange ribbon.
  • I'm going to try to dye my own tights.
  • Some things dye like the old coffee filter science experiment where the colors separate.